

Wednesday, December 19, 2012
Dec 19
Had a "toon" made of the B400. I think it came out really neat. Check out his web page and order your car in Artbomb form!! www.eyemechanic.webs.com/artbomb

Tuesday, December 11, 2012
Dec 11
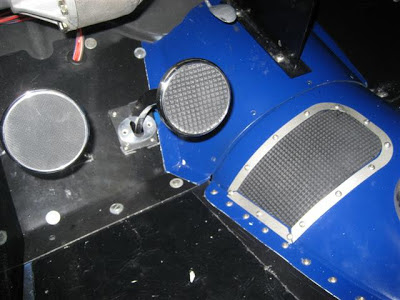
I worked over the peep mirrors today, removed the mirrors and replaced with a convex one that will help me see who is behind me. Of course I broke both old mirrors while removing them, will that give me 14 years of bad luck?? I added a rubber pad, framed with 16 gauge strip all screwed down with button fasteners to the trans hump, this will protect the blue paint from my right foot. I also cut some new rubber pedal inserts to match the floor rubber and the trans pad. If you look closely the brake pedal has the new pyramid design rubber, the clutch has the original finish yet.... they will look better to match the floor,anyway I think so. I powder coated the steering column, Hoodlum plaque bracket and the seat latch bracket, while the oven was hot I coated my new shop door decoration. The gas tank is all finished, strapped down, wires run and fuel line secured, looks kind of cool...to bad the rear seat will cover most of it up


Friday, December 7, 2012
missed a couple....
shifter ball....blue 2 ball
Gates shrink radiator hose clamps.......


 no ugly metal clamps


Dec 7th...misc pics
some misc pictures........finished the bracket for the column today, added the turn signal switch, added a brass plate that says "hot rod made in usa" to the column drop, tail light detail wiring, old regulator cover that covers the battery cable bulk heads, made a bracket for the "Hoodlum" plaque, painted the plaque, shifter handle...a pool ball, blue with a "2" on it...perfect match. Now I need to powder coat the steering column bracket, the steering column and the seat latch...maybe tomorrow. Had to put the snow blower on the John Deere today, I have putting that off for ever...forecast shows 5 to 6 inches bu Sunday, that slowed down the 400 progress...oh well, there is next week.


Wednesday, December 5, 2012
December 5th...more progress
Its been a while since I have posted. I have been busy, doing many things that don't really show, but still makes progress. The exhaust is reinstalled for the final time.
Should have been a real simple thing, it was on before. This time I had the starter on, the header tube would not clear the starter. I had my machinist friend redrill the base of the starter so that it could be rotated by a quarter......fits now. The blue Porter mufflers were installed with my "touch"...silver Porter medallions glued to them......can't hardly see them but I know they are there!
I fitted the louver panel to the rear drive shaft hump, drilled holes around the outside to bolt them down and then drilled 1/8th holes for button head bolts to make the hump appear to be bolted to the floor. Just for kicks, and now the drive shaft hump matches the tranny hump. It will soon anyway, as soon as I paint it semi gloss blue.
The last bit of the fuel line was installed, thru the floor and to the tank, the vent hose is now in position. The rear wires are run all the way, just waiting for the tail lights to be finished and mounted. The rear turn signal wires run, the 3 wires for the gas sender done. The steering gear is a Shroeder sprint car unit with a quick 8:1 ratio, makes for a very quick steering. I purchased a 2:1 quickener, installed it backwards, that should slow down the steering to 16:1....the same as a Vega box. I measured where to cut the shaft for the reducer to fit and took it to Fat Joe to cut and weld it back together, he does good work. I got a new piece of 1 1/2 inch tubing from him, had him flare one end, made a base plate plate, welded it together for a steering column. Tomorrow I will reinstall the steering gear, make a bracket to keep the reducer from spinning when I turn the wheel, paint the new tubing column piece and finish up the install...oh yea, install the chrome pitman arm and add the drag link.
I used aluminum gas line to fit the edge of the rear bomber bench seat and had Fat Joe tig it to the seat side edge....looks good, matches the front seats better and softens the edge. The rubber seal around the windshield is on and the corners cut for a mitered fit and super glued together, now just put it in. The hood tops are fitted, now the side panels are next. The vent hose for the rear end is installed and mounted to the floor out of the way. The three tables of parts are becoming much thinner...looks good to see table tops


 and not parts.


Subscribe to:
Posts (Atom)