Saturday, January 12, 2013
Got the hood installed and fitted.looks good I think. The car will go to the upholstery shop in the next few days. I blasted the seats to bare aluminum, now just prime and paint them fine silver, base/clear, they should look good. I had Hearthrob exhaust water jet cut some trim pieces for the doors. I made the pattern from cardboard to size, then John transfered the size to the computer, sent it to the waterjet and hit the button. It would be so cool to have a small size (home size) of a water jet. Boy could I make some cool things. I have had a cold and the flu for the last two weeks, that really slowed down progress in the shop, I just could not get motivated to do much...feeling much better, so maybe this week will be more productive.
Wednesday, January 2, 2013
Jan 2, 2013
I've been working every day on the car, but the pictures show very little progress. Funny how little things take so much time but so so little.
The turn signals are now totally hooked up and work. The flasher can that I used was defective, so after buying a new one and switching a couple of wires around its all better. The glass is now installed. The glass guy put the bottom channels on the door glass backwards. I had to hammer them off flip flop them and pound them back on. I did it without breaking the glass, that was good. The rubber floor mat is all fitted and cut and installed for the last time, the seat belt hooks are in, all the trim button heads on the drive shaft tunnel are in. I painted the tunnel satin blue to match the trans tunnel and the glass garnish. The windshield wiper is in and wired. The little switch panel is for the wiper, fuel pump and fan. Each toggle switch has also a indicator light that shows that the switch is on. There is at least 12 wires behind that panel. I decided to cover the kick panel with the leather so Al didn't have to work with all the wires. I like the look of the leather. The head light test almost worked. I had low beams but not high beams. I installed a relay on the high beam side to protect the switch from the halogen high beam draw. After a bit of checking I found a bad connection on one of the relay wires. Simple but took a little time. That's how the last two weeks went, everything took tons of time.
Tomorrow I have to fit the hood sides. I still need to adjust and bleed the brakes. I need to bleed the clutch line too. The E brake cables will need to be hooked up and adjusted. Its almost done. It will go the interior shop (Rapid Upholstery) in the next 2 weeks. I head to the GNRS later this month, so it all needs to be done in the next couple of weeks.
Wednesday, December 19, 2012
Dec 19
Tuesday, December 11, 2012
Dec 11
I worked over the peep mirrors today, removed the mirrors and replaced with a convex one that will help me see who is behind me. Of course I broke both old mirrors while removing them, will that give me 14 years of bad luck?? I added a rubber pad, framed with 16 gauge strip all screwed down with button fasteners to the trans hump, this will protect the blue paint from my right foot. I also cut some new rubber pedal inserts to match the floor rubber and the trans pad. If you look closely the brake pedal has the new pyramid design rubber, the clutch has the original finish yet.... they will look better to match the floor,anyway I think so. I powder coated the steering column, Hoodlum plaque bracket and the seat latch bracket, while the oven was hot I coated my new shop door decoration. The gas tank is all finished, strapped down, wires run and fuel line secured, looks kind of cool...to bad the rear seat will cover most of it up
Friday, December 7, 2012
Dec 7th...misc pics
some misc pictures........finished the bracket for the column today, added the turn signal switch, added a brass plate that says "hot rod made in usa" to the column drop, tail light detail wiring, old regulator cover that covers the battery cable bulk heads, made a bracket for the "Hoodlum" plaque, painted the plaque, shifter handle...a pool ball, blue with a "2" on it...perfect match. Now I need to powder coat the steering column bracket, the steering column and the seat latch...maybe tomorrow. Had to put the snow blower on the John Deere today, I have putting that off for ever...forecast shows 5 to 6 inches bu Sunday, that slowed down the 400 progress...oh well, there is next week.
Wednesday, December 5, 2012
December 5th...more progress
Its been a while since I have posted. I have been busy, doing many things that don't really show, but still makes progress. The exhaust is reinstalled for the final time.
Should have been a real simple thing, it was on before. This time I had the starter on, the header tube would not clear the starter. I had my machinist friend redrill the base of the starter so that it could be rotated by a quarter......fits now. The blue Porter mufflers were installed with my "touch"...silver Porter medallions glued to them......can't hardly see them but I know they are there!
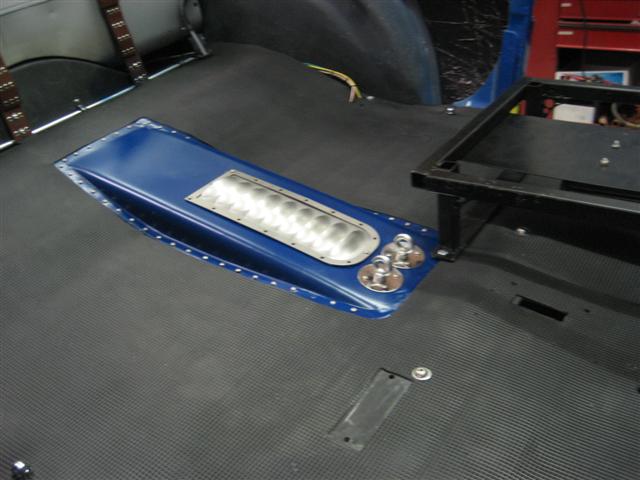
I fitted the louver panel to the rear drive shaft hump, drilled holes around the outside to bolt them down and then drilled 1/8th holes for button head bolts to make the hump appear to be bolted to the floor. Just for kicks, and now the drive shaft hump matches the tranny hump. It will soon anyway, as soon as I paint it semi gloss blue.
The last bit of the fuel line was installed, thru the floor and to the tank, the vent hose is now in position. The rear wires are run all the way, just waiting for the tail lights to be finished and mounted. The rear turn signal wires run, the 3 wires for the gas sender done. The steering gear is a Shroeder sprint car unit with a quick 8:1 ratio, makes for a very quick steering. I purchased a 2:1 quickener, installed it backwards, that should slow down the steering to 16:1....the same as a Vega box. I measured where to cut the shaft for the reducer to fit and took it to Fat Joe to cut and weld it back together, he does good work. I got a new piece of 1 1/2 inch tubing from him, had him flare one end, made a base plate plate, welded it together for a steering column. Tomorrow I will reinstall the steering gear, make a bracket to keep the reducer from spinning when I turn the wheel, paint the new tubing column piece and finish up the install...oh yea, install the chrome pitman arm and add the drag link.
I used aluminum gas line to fit the edge of the rear bomber bench seat and had Fat Joe tig it to the seat side edge....looks good, matches the front seats better and softens the edge. The rubber seal around the windshield is on and the corners cut for a mitered fit and super glued together, now just put it in. The hood tops are fitted, now the side panels are next. The vent hose for the rear end is installed and mounted to the floor out of the way. The three tables of parts are becoming much thinner...looks good to see table tops
and not parts.
Subscribe to:
Posts (Atom)

.jpg)
.jpg)
.jpg)
.jpg)
.jpg)
.jpg)
.jpg)